This is an old revision of the document!

Getting Started
Android device hardware requirements
Google Mobile Services (GMS)
- There is a good chance that if your proposed device is not on this list of supported models, then it will not support Google Mobile Services (GMS), mSupply Mobile and/or the Mobile Device Management software used to remotely manage the device.
- Even if it is on this list, please make sure the device has been successfully enrolled in the Mobile Device Management software, and mSupply Mobile is successfully running before procuring any volumes of the device.
Android version
- mSupply may be able to work on older versions of Android, but, for ease of management, Android 6 is the lowest acceptable version. Enrollment and management is even less error prone with Android 9+.
- Android 9 was released in August 6, 2018. Why would you be installing hardware that is already several years closer to it's end of service life?
Minimum specifications
- Minimum display size: 9.8 inches (measured diagonally)
- Minimum display resolution: 768 × 1024 pixels
- Android Version: 6.0
If mSupply Vaccine or mSupply ColdChain are to be used on the device at any point, the following are required minimum specifications:
- Minimum display size: 10.1 inch (measured diagonally)
- Minimum display resolution: 800 x 1280 pixels
- Android Version: 8.1
The device must also be compatible with MDM (Mobile Device Management) software and support google services. Please contact Sustainable Solutions or mSupply Foundation for details.
Recommended Specifications
These recommended specifications will allow mSupply Mobile to operate well on the device.
- 1.5 Gb Ram
- Quad-core 1.3 GHz
How will it connect to the internet?
The most challenging aspect of any remote data recording solution is management of the internet connection. It may be worth procuring devices that are mobile data enabled (3G minimum), at least to allow future flexibility. But that doesn't answer the harder questions:
- Who is responsible for keeping the device connected?
- Who pays for it?
- What happens when the bill isn't paid?
- What happens when a generous data cap is exceeded and the internet connection is down? (Somebody may have removed the SIM from the device and placed it in another device…)
Most officers in charge of an mSupply Mobile device are capable of keeping their personal cellular mobile device connected to the internet, at least occasionally, which is all that mSupply Mobile needs. An officer could be happy to receive a nominal monthly fee to tether the mSupply Mobile device to their personal cellular device hotspot and data. This fee might only be payable if the officer meets certain pre-agreed KPIs such as:
- Ensuring device has connecting to the internet at least, say, once per week,
- Conducting stocktakes
- placing internal orders
- processing supplier invoices
- others …
Of course, such an arrangement would still require management…
Installation
You can download the latest version of mSupply Mobile from GitHub here
If you are upgrading to mSupply Mobile version 2.0.0, there are a few changes that need to be made to your mSupply Desktop/Server:
- Upgrade to mSupply Server v3.83 or higher
- Set Visibility for Supplying Stores (including main Supplying Store)
- Add a new Supplier as facility (External Supplier) and make it visible in mobile store
- Set all other mobile/desktop stores that current mobile store needs to interact with (send/receive Requisition, send/receive Invoices) as 'transfers' in store/synchroniser (this needs to be done by your mSupply team)
Initialisations
The mSupply Mobile app needs to be installed on your tablet. Once it is started, you need to enter the site user name and password and the URL for the mSupply server that will hold the data generated by the tablet.
There is also a little configuration required within mSupply. Refer to the mSupply User Guide for details.
OK. Here we go!
(Check you've initialised your tablet with the site user name and password in the step above first).
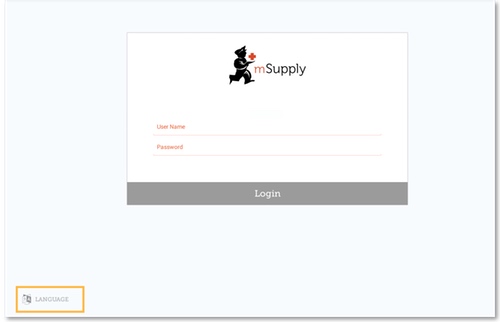
This is the login screen. You will be given a user name and password when your tablet computer is installed at your clinic. Your tablet computer can only log in to one facility.
The first thing to do is to choose your preferred language by clicking Language at the bottom left of your screen.
The tablet above is asking for the user name and password for the person that will be operating the store. This user name and password needs to be set on the mSupply server. Refer to Managing Users in the mSupply User Guide.
For example, if your first language is Tetum, then you're in luck!

Once you have selected the language of your choice, enter your user name and password and click Login!

After 3 minutes of not using the app (either it is in the background, or the app is asleep), you will be logged out.
This brings us to the main screen. We will be returning to the main screen a lot as we use mSupply Mobile, so it's important to understand the main functions. Let's go through them one by one.

Red badges indicate there are unfinalised transactions requiring attention. Click a badge for a description. Badges will automatically disappear when there are no unfinalised transactions remaining.

A link on the top right of the screen shows the Sync Status.

Clicking this link will take you to a page where you can choose to do a manual sync if there is internet connectivity.

You can close this page by clicking the cross on the top right.
Users with the appropriate permissions can access the mobile Settings on the bottom right of the screen.

To log out, click the Log Out button on the bottom left of the screen.

Customers
 The Customers area is for all the stock that goes OUT of your facility. Customers can be other facilities you supply, doctors and nurses doing outreach tours, or individual patients.
 The Customer Invoices button shows a list of orders sent TO your customers and allows you to create new ones.
 The Customer Requisitions button shows a list of orders placed BY customers requesting stock from your store.
Suppliers
 The Suppliers area shows orders that you have placed and received for your own stock. Usually, you will only have ONE supplier (a medical store or other healthcare facility) and this will be pre-programmed for you.
 The Supplier Invoices button shows a list of orders you have received or are waiting to receive.
 The Supplier Requisitions button allows you to place an order and shows a list of orders you have already placed.
Stock
 The Stock section is used to manage the stock in your store.
 The Current Stock button allows you to easily see how much stock you have on hand (“How many paracetamol tablets do I have?”), search for an individual item, or check expiry dates.
 The Stocktakes button allows you to do a stocktake on all items or a small selection of items and shows you a list of all previous stocktakes. You can also use this area to update the stock levels of an item when you realise there is a mistake.
(And here's the main screen in Tetum!)

| Previous: Userguide - mSupply Mobile | | Next: Customer Invoices |