This functionality is available from mSupply mobile v7.0.0 onwards
Cold Chain (for Vaccines and other Cold chain items)
Setting up to use the Vaccine module
Vaccine mode only shows if the store is configured correctly on the server, with the preference 'mobile: Uses vaccine module' enabled. Read how here
Permissions and Services
The vaccine module requires additional permissions and services to be enabled on your mobile device.
When all permissions and services required for Mobile ColdChain are enabled, the 'cog icon' will be in the mSupply Mobile title line (top right of your mobile screen):

However, if some required permissions and services are disabled, the 'hazard icon' will be in the mSupply Mobile title line:

If your title line shows that some permissions and services are disabled, press on the 'hazard icon' to open the Permissions and Services window.
Any permission or service that is disabled will be indicated with a 'cross icon' as below:
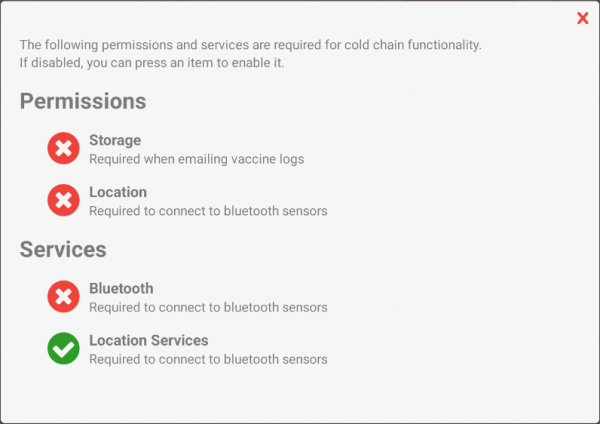
To enable, simply press on the cross icon next to the permission or service. Your device will prompt you to enable the permission or service.
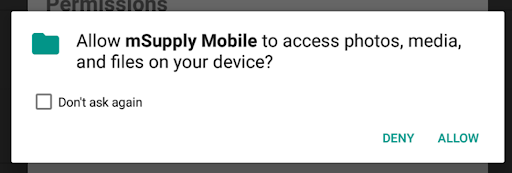
Press Allow.
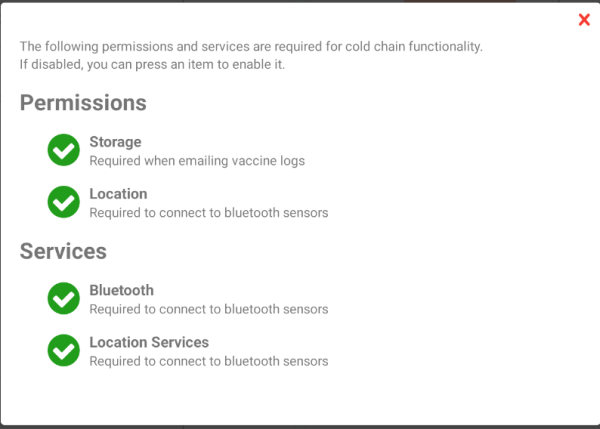
Once all of the permissions and services have been enabled, your window will look like this:
Approved mSupply Temperature Sensors
The following is a list of approved temperature sensors that will work together with mSupply ColdChain and mSupply Mobile: Vaccines. These sensors have been approved by the World Health Organisation as a temperature monitoring device suitable for use in immunization programmes.
- Blue Maestro Tempo Disc™ Waterproof IP67 Bluetooth Temperature Sensor Beacon and Logger Download PDF.
Approved sensors can be purchased directly from the manufacturer or reseller online. Please contact coldchain@msupply.foundation for further information.
Adding Sensors
The first time you use the Vaccine module, there will be no sensors connected to your device.
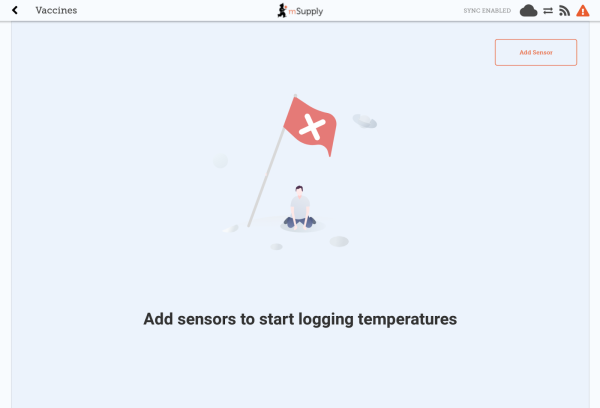
Tap Add Sensor to start the three-step process to add a sensor.
Please make sure that you have an approved mSupply temperature sensor. Only approved sensors can be connected to mSupply Mobile.
We recommend you keep the sensor close when you are adding or editing it within mSupply Mobile. Also, allow for up to a minute for any changes to be communicated via Bluetooth. If you are using a brand new sensor, press the top of the sensor until it flashes to turn it on.
Step 1: Select the correct sensor
When you tap Add Sensor, your device will scan and list any sensors that can be connected by Bluetooth.
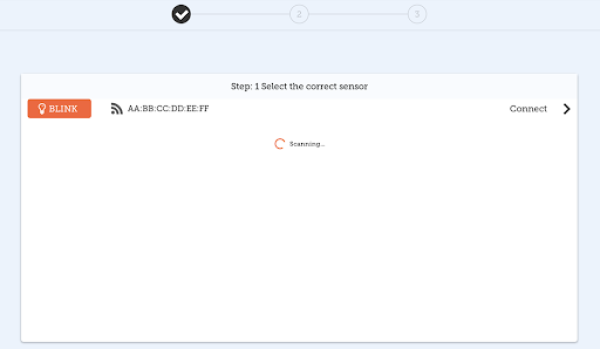
If you tap the BLINK button, the LED light for that sensor will flash. You can use this to make sure that you are connecting the correct sensor.
When you are sure that you have the correct sensor, tap Connect for that sensor.
Step 2: Sensor Thresholds
Firstly, some definitions:
- Consecutive means a single event where the temperature stays over (or under) the threshold for the whole time. So if you have a threshold of 8 degrees, and a consecutive breach time of 10 minutes, then a breach that lasts for 6 minutes, then drops under the threshold for 2 minutes, then breaches again for 6 minutes is not a consecutive breach, but the 2 x 6 minute breaches are added to the cumulative breach records.
- Cumulative means adding together the total time over a certain temperature for a series of breaches.
Now we can set the temperature breach conditions for the sensor. There are four thresholds that you can define:
- Hot Consecutive
- A breach will be displayed when the sensor logs a temperature above this value for longer than the specified time. Using the
+/-buttons, select the maximum temperature and minimum duration required to identify the breach.
- Cold Consecutive
- A breach will be displayed when the sensor logs a temperature below this value for longer than the specified time. Using the
+/-buttons, select the minimum temperature and minimum duration required to identify the breach.
- Hot Cumulative
- A breach will be displayed when the sensor logs a temperature above this value for longer than the total specified time specified (total time is calculated as the sum of all breach times). Using the
+/-buttons, select the maximum temperature and minimum total duration required to identify the breach.
- Cold Cumulative
- A breach will be displayed when the sensor logs a temperature below this value for longer than the total specified time specified (total time is calculated as the sum of all breach times). Using the
+/-buttons, select the minimum temperature and minimum total duration required to identify the breach.
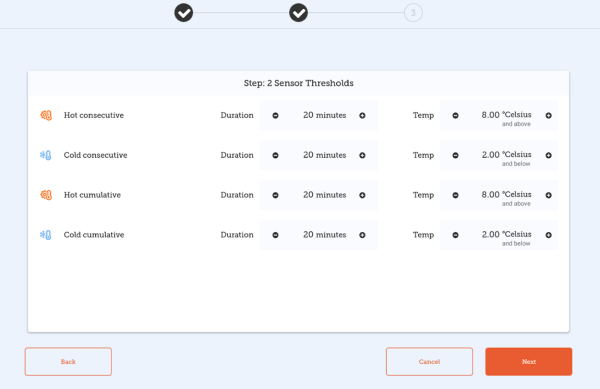 TIP: It is possible to long press the +/- buttons to change the values faster.
Tap Back if you wish to return to Step 1 and check that you have the correct sensor.
Tap Next to move to Step 3.
Tap Cancel if you no longer want to add the sensor.
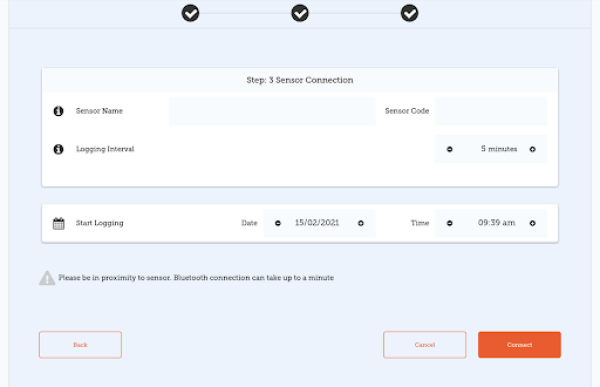
Step 3: Sensor connection
In this final step you need to enter:
- Sensor Name: enter a new name for the sensor. This is the name which will appear within mSupply mobile. You should choose a name to make it easy to identify the sensor.
- Sensor Code: enter a short name code for the sensor. You should choose a code that is unique for each sensor.
TIP: For reporting purposes, we recommend that you do not use special characters such as “-, +, *” etc in either the Sensor Name or Sensor Code fields.
- Logging Interval: using the
+/-buttons, select the length of time between temperature logs. You can set the logging interval to any length between 1 and 30 minutes. The default logging interval is 5 minutes. - Start Logging: Use the
+/-buttons to select the delay in minutes from now of the first temperature log. The sensor can be configured to start a maximum of 30 days from the current date.
When setting the schedule for the first temperature log, allow sufficient time for the sensor to be placed in its desired location and adjust to the location’s temperature. 20 minutes should be sufficient in most situations.
Tap Connect to complete sensor setup and add the sensor to mSupply mobile. This will return you to the mSupply mobile vaccine home screen and you will see the sensor has been added.
Tap Back if you wish to return to Step 2 and edit the sensor thresholds (temperature breach conditions).
Tap Cancel if you no longer want to add the sensor.
We recommend that each device should be linked to a maximum of six sensors. Each sensor should only be linked to one device.
Edit Sensor
To edit sensor details, you can tap on the ‘’cog’’ icon on the mSupply Vaccine home page (above screenshot) or on the Sensor Detail screen. Screenshot
All sensor threshold and sensor connection details are editable except for the start Logging date and time. Simply tap on the field that you wish to end and make changes.
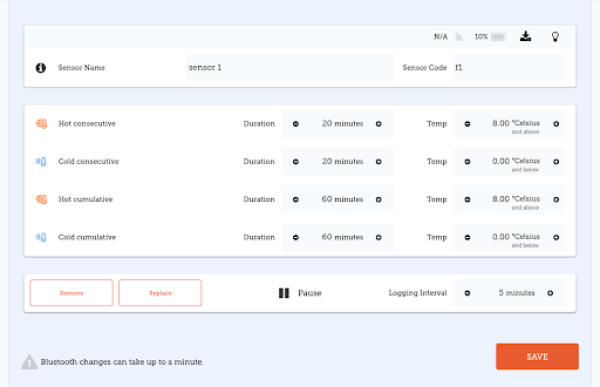 No changes will be made until you tap
 Save.
NOTE: Depending on your proximity to the sensor and the Bluetooth capabilities of your device, changes can take a few minutes.
Pausing Sensor Downloads
The edit screen also allows you to Pause temperature logging by the sensor. When a sensor has been paused, it will appear in the title line both on the mSupply mobile vaccine home screen as well as the Sensor Detail screen.
Replacing a Sensor
Tapping Replace will open up the scanner and allow you to choose from list of alternative sensors. The list will only show sensors that are not currently connected to your device.
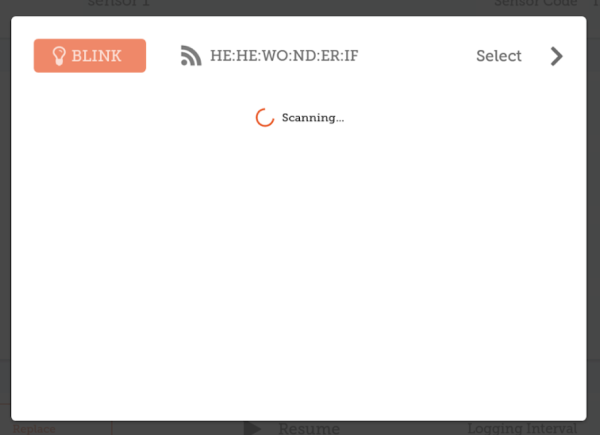 From the list, select the replacement sensor. You can press
 Blink to check that you have the correct sensor (the LED light will flash for this sensor).
Deleting a Sensor
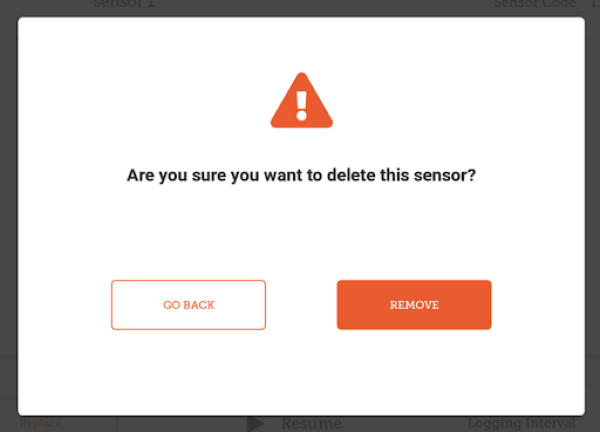
Tap Remove to remove any sensor no longer being used. You will receive a prompt to confirm the deletion.
Using the Vaccine module
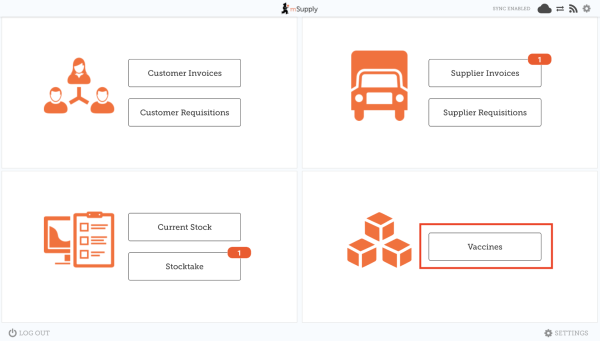
Enabling the Vaccine module will change the look of your menu page, adding an extra Vaccines button.
Supplier Invoices
With vaccine module enabled you automatically get a few extra columns on a supplier invoice for vaccines - the Location and Vaccine Vial Monitor (VVM) status columns.
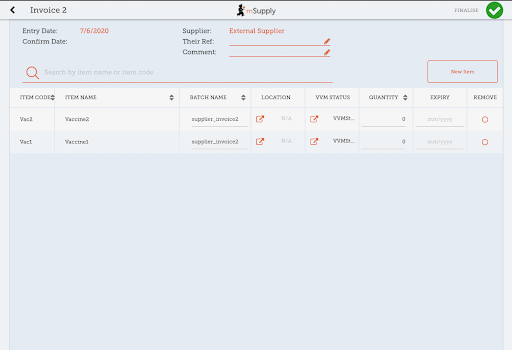 You can select a location by tapping on the arrow icon in the Location cell. This will allow you to choose a location from a list.
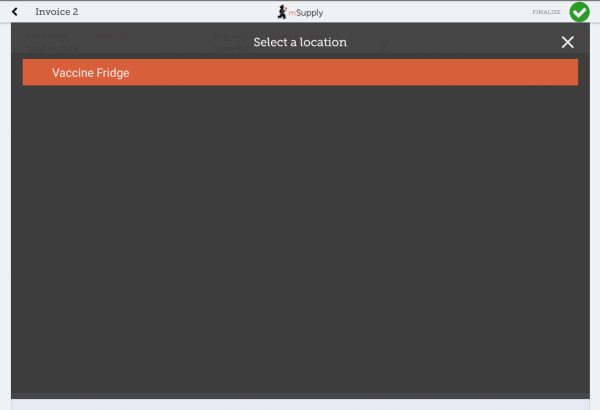
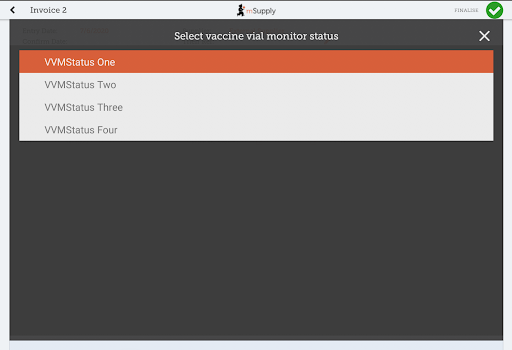
You can also change the Vaccine vial monitor status for items that have been defined as vaccines on the cloud server - this defaults to the lowest level, but can be edited by clicking on the arrow icon in the VVM Status column.
Customer Invoices
Vaccine module automatically adds two extra columns on a customer invoice - the Doses and Breach columns.
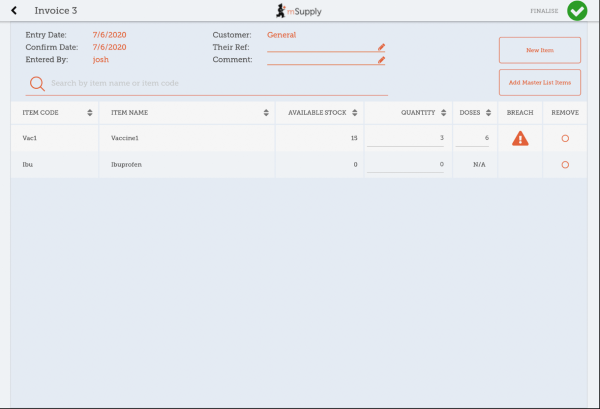
- The Doses column is for the number of doses actually used (so we can account for open-vial wastage). It will automatically get populated by the item quantity * number of doses in a vial, for convenience, but you can also edit it! There is a maximum limit of the number of doses in a vial for that vaccine * the quantity, though.
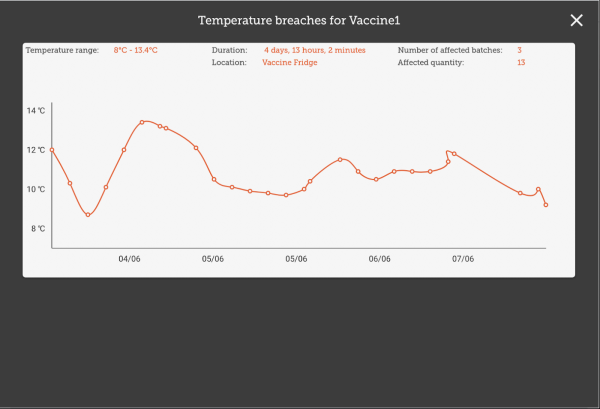
- The Breach column shows when a vaccine item has been in a temperature breach. Note that without entering a quantity into the customer invoice for the item, we don’t know exactly what batches are being issued, so the breach icon may not show up yet.
- If the breach icon (an orange triangle with an exclamation) does show for a row, this signals that the stock line has had a temperature breach. Tapping the icon will bring up a graph of the temperature breach. In the example below, the fridge seems to be broken, probably not a good idea to use this batch!
Supplier Requisitions
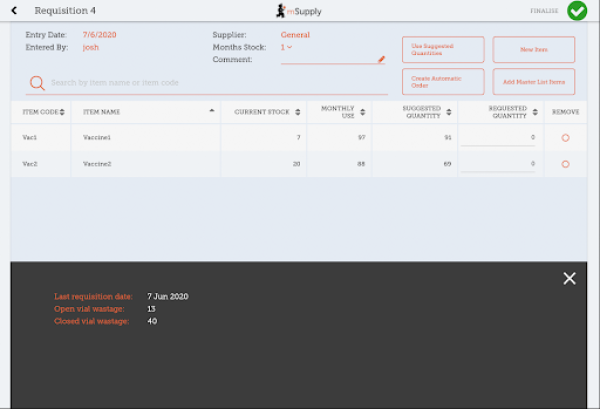
Tapping on a row in your supplier requisition will show you the date of the last requisition for your vaccine, as well as other details such as the open and closed vial wastage since the last requisition.
Stocktakes
Tapping on a stocktake row for a vaccine item will also show the additional columns for Doses and Breach.
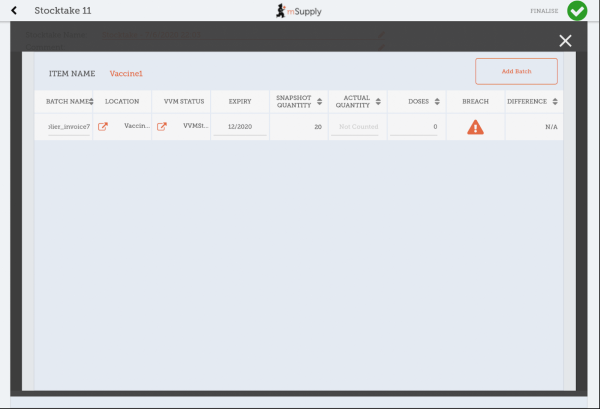
Here, you can adjust the quantities of your vaccine if needed, change the location, or if the vaccine vial monitor status has changed, you can update that here. You can also view the breaches the batch has been in to help you make decisions!
Vaccine home page
Tapping on the Vaccines button in the menu page will bring you to a list of all the temperature sensors connected to your device and an overview of current status and actions for each sensor.

The sensor header displays the following information:
- Circle: a green circle indicates that the sensor is currently within the specified temperature range and the sensor battery is equal or above 25%. A red circle indicates that the sensor is currently outsides the specified temperature range or the sensor battery is below 25%.
- Sensor Name: as configured during sensor connection.
- WiFi Icon and last log time: the time of the last temperature download occurred. The time will flash when download is currently in process.
- Battery Icon: a percentage figure and icon showing remaining battery charge for the sensor.
- Down Arrow Icon: Tap to export sensor data (temperature logs and breaches) to csv format and send via email data.
- Light Bulb Icon: Tap to make the sensor LED light flash/blink.
- Cog Button: Tap if you wish to edit the sensor configuration.
The row under the sensor header displays the following information:
- Sensor’s MAC address
- Thermometer icon and last recorded temperature
- Clock Icon and the time of the last temperature breach (if applicable)
Tap anywhere on a sensor box to view further details.
Sensor Detail
Tap on the date range on the top left of the screen to change the time (and data) displayed.
The header information is as above.
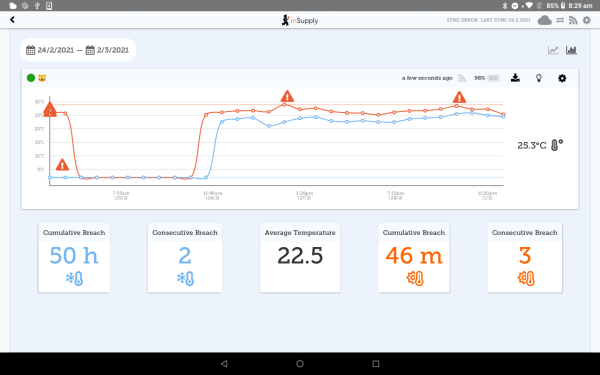
Temperature Graph
The red line represents the hot consecutive threshold. The blue line represents the cold consecutive threshold. (You can set these here). Any temperature logs outside of the lines (breaches) will be indicated with the exclamation icon. The last temperature logged will display to the right of the graph. The sensor status rectangle (surrounding the last temperature log) will be:
- red for a hot breach.
- blue for a cold breach.
Temperature Cards
Underneath the graph are five temperature cards:
- Cold Cumulative Breach: the length of the breach
- Cold Consecutive Breach: the number of breaches
- Average temperature: calculated over the date range selected in degrees Centigrade
- Hot Cumulative Breach: the length of the breach
- Hot Consecutive Breach: the number of breaches
Exporting Sensor Data
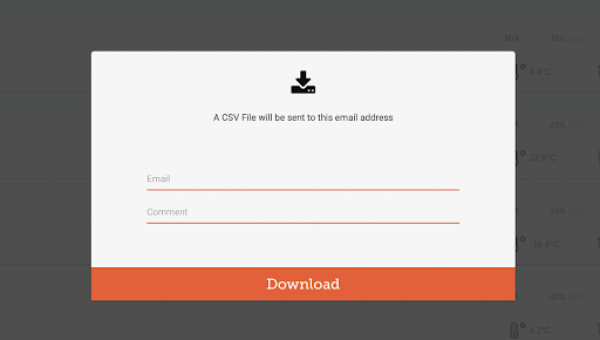
It is possible to download the temperature (breach) logs and sensor settings by clicking the ‘Download’ button in the header (on either the Vaccine home page or the Sensor Details page).

The Download screen requires:
- Email address
- Comment
Tapping Download will open a new email in your device’s email application. The receiver address and comment will be prepopulated, and the sensor data (in CSV format) attached, ready to send.
TIP: If you change your mind about emailing the data, tap anywhere in the grayed-out area.
Temperature Breaches
Temperature breaches are displayed on the graph as warning icons.
As of February 2024 it is not possible to acknowledge the breaches in mSupply Mobile.
However, note that this functionality is now available in Open mSupply: See https://docs.msupply.foundation/docs/coldchain/monitoring/#acknowledging-breaches
| Previous: The Cash Register | | Next: Mobile Settings |
