This is an old revision of the document!
Setting up mSupply Mobile - Device side
The following details the steps of setting up mSupply Mobile on your device
This step could be carried out by the mSupply Support Team or by your team with support from them.
Hardware
Refer: Hardware requirements
Device setup
- The Device is the property of the facility, not the user.
- The user could move on and another officer will need to take over operation of the device.
- Therefore, any accounts set up on the device should NOT be those of the user.
The simplest and surest way to set up devices is:
Initial Android device power up
- It is virtually impossible to prevent a modern Android device which is connected to the internet from doing at least some software updates. These can be of the order of 0.5 GB of data. If the device's OS is updating you can add ~1.0 GB to that!
- If possible, it is worth preventing these updates from occurring over slow and expensive cellular data connections.
- Therefore, it is recommended to connect the device to a (lower cost and faster) internet connected Wi-Fi network at the time of initial device power up and allowing OS updates and mSupply installation.
- Once this process is complete, the device can then use its cellular data connection for ongoing mSupply operation.
- Each new version of Android and the branded OS introduce changes to the menu structure. These instructions will likely need to be amended to suit the particular version of Android and branded OS. Therefore, these instructions are generic, and will likely need to be documented in more detail depending on the particular device and version of Android and branded OS

- Power up the device
- You should see a Welcome! screen where you will be asked for a language. Select an appropriate language, then tap START
- You should be prompted to connect to a Wi-Fi network. Even if you will use a Wi-Fi network as part of the process of setting up the device, turn Wi-Fi
Offfor now, then tap NEXT. If possible, we'll connect to a Wi-Fi network later. - You should be prompted to accept Terms and Conditions. The only one compulsory appears to be the End User License Agreement.
Un-tickDiagnostic data and Marketing information. tap NEXT - You should be prompted to accept a number of Google services:
- Use Google's location service to help apps: Turn
On - Improve location accuracy: Turn
On - Send system data: Turn
Off
tap NEXT
- Because you have not connected to Wi-Fi, you should be prompted to set the Date & time: Set these correctly.
- You may be prompted to provide a Name, or sometimes First and Last name. Do NOT use the personal name of the Officer In-Charge (OIC) of the facility. A convention to follow is to set the the Name (or First name) to the facility name. If you are prompted for a Last name, set that to the district / province. e.g.
Name (or First name):WAFI HC
Last name:Bulolo
Take care: Your device will likely try to autocorrect your spelling!
Then tap NEXT.
- You should be prompted to select a Lock type. Choose PIN.
- You should be prompted to Secure startup. Choose Require PIN when device powers on, then tap CONTINUE.
- You should be prompted to Set PIN. Set it to
6787(MSUP), re-enter it to confirm it. - You should be prompted to set Notifications. Set it to Show content, then tap DONE.
- You should be prompted to create a Samsung account (obviously will be different for other branded devices). Tap SKIP
- You may be prompted to confirm that you wish to Skip Samsung account setup?. Tap SKIP
- You may be prompted to configure More useful features. Decline all of these. Tap FINISH
Android tweaks
There are a number of tweaks that are worth applying before proceeding further:
Screen timeout
- The default screen timeout can be quite short (30 seconds). For normal mSupply operation, this is too short. This should be set to at least 2 minutes. Settings > Display > Screen timeout Set to, say,
5 minutes
Turn off 'Capitalise first letter'
In order to ease operation on the tablet, it's a good idea to avoid capital letters. This is also facilitated by turning off 'capitalise first letter' in the keyboard setting on the device.
- Samsung devices: Settings > General management > Language and Input > On-screen keyboard > Samsung Keyboard > Smart typing > Auto capitalise:
Off
Device updates
As soon as your device accesses the internet, it will likely try to update software. This can take unnecessary time and data. We need to take action to minimise this. It is worth deleting or disabling as many extra apps on the device as possible, including:
- All brand bloatware (Samsung / Lenovo / etc.)
- All MS Office applications
- All Google applications
- Settings > Software update > Download updates automatically
Un-tick
Allow apps to be installed from local sources
- Settings > Lock screen and security > Unknown sources: Turn
On
Enable Knox security (necessary for Sure MDM management - see below)
- Settings > Device maintenance > Device security Accept the prompted permissions request
- Knox active protection: Turn
On
- You may be prompted for various services by the pre-installed apps. Ignore / defer / deny all of these.
At this point, the device will try and update its apps. Proceed as quickly as possible to the next step:
- Turn off the manufacturer's Auto updates for the device:
- Apps > Samsung > Galaxy Store > Settings (top right menu) > Auto update apps > Never. While you are in the Auto update apps area:
- Turn
OffUpdate notifications - Turn
OffMarketing choice
- Enter the credentials for a local Wi-Fi network, then tap NEXT.
PIN code for SIM
To prevent removal of the SIM from the device and use of the SIM on another device, it is a good idea to set the SIM PIN.
Device remote management
As of 2019-10-15, SureLock and SureMDM are used to manage Android Tablets running mSupply Mobile around the world.
- SureMDM allows remote management of the tablets. With SureMDM We can install and uninstall software, track the location of the tablets and wipe the contents of the tablets remotely. Many other functions as well.
- Surelock locks the Tablets into Kiosk mode. This means only the apps (mSupply, Telegram, Gmail, etc.) will run on the tablets. The user is presented with a home screen that only contains icons for these apps and all other functions of the tablet are locked down.
Management using SureMDM
Once SureMDM is installed on the device, considerable control over the device is possible including remotely deploying, installing and executing apps including SureLock.
This control is generally managed through application of SureMDM 'Jobs'. This document does not detail SureDMD Jobs as the exact configuration will depend on a number of local specific factors.
Install other Apps
The following Apps, or equivalent, are recommended:
- Calculator - use the device's calculator
- Wi-Fi centre - use the device's Wi-Fi control.
- Instant Messaging for communication between sites and with support workers: Recommend Telegram. Use the devices's SIM number, not the personal SIM number of the operator.
While the instant messaging app can be installed remotely using a SureMDM job, it may be more convenient to install it manually from a PC at the same time as installing SureMDM and SureLock.
Configuring mSupply Mobile on Device
Initialising the store
After installing the mSupply Mobile app, you must do an initialisation of the data for the store that the tablet is going to be used in. On opening the mSupply Mobile app, the first screen looks as follows:

You must enter:
- The correct URL for your mSupply server, usually using SSL/HTTPS protocol for security, e.g
https://yoursite.msupply.org - Sync site name as configured on the Primary Server.
- Password for the sync site name as configured on the Primary Server

Once you have entered the information, click “Connect” to start sync:
 Initialisation can take between 1 and 15 minutes, depending on the number of records on the server related to the site being synced. Once the server has found all the records to sync, mSupply Mobile will start pulling them adaptively between 20 and 500 records at a time depending on the connection speed. If connection is lost or you closed the app, you can resume sync where it stopped by entering the exact same details. It will start again from scratch if you get it wrong before getting it right again!

Logging in to the store
Once complete, you will be taken to the login screen. For guidance beyond here see the mSupply Mobile usage guide.
Limiting Initial Sync Record Count
If the amount of records to sync is large (say around 50,000) it may take hours to sync, particularly on a poor internet connection. For this reason it is possible in mSupply to limit the amount of records up to a specified amount of months ago.
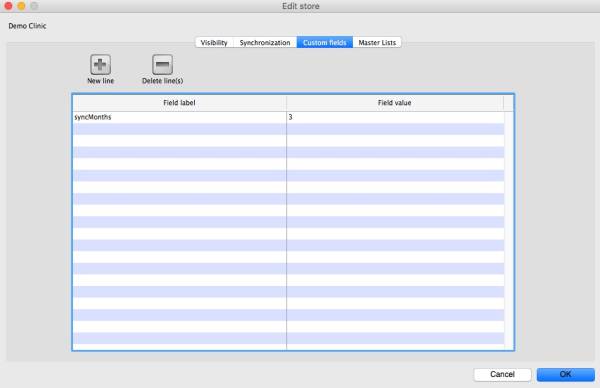
- You need to change the store synchronisation type from “collector” to “active” or “none” to unlock adding custom data
- Add a custom data row with “Field label” `syncMonths` and the numeric value desired in “Field value”
- Change the store synchronisation type back to collector
Now when you do initial sync, the store will only get transactions and stock takes for as far back as specified from the current date.
Related Links
| Return to: mSupply Mobile Home page |