Excel report e-mail scheduler - End-user instructions
Description
The Open mSupply Dashboard Excel report e-mail scheduler plugin which takes data from panels of mSupply dashboard to generate excel reports.
The reports are then emailed to a custom user report group, this report group is curated from the list of mSupply users, pulled from mSupply Dashboard's datasource.
The timing of the scheduler can be set in the plugin.
How to use
This setup functionality is only avilable to users with administrator access to the dashboard. Other non-admin users will not be able to access this plugin page and hence will not see it in the dashboard interface.
Administrator access is dangerous because it also gives access to the other areas of dashboard setup and changes can prevent the dashboard working or damage the underlying data. We strongly warn the users to only make changes in the plugin pages, and to do so carefully. You have been warned 
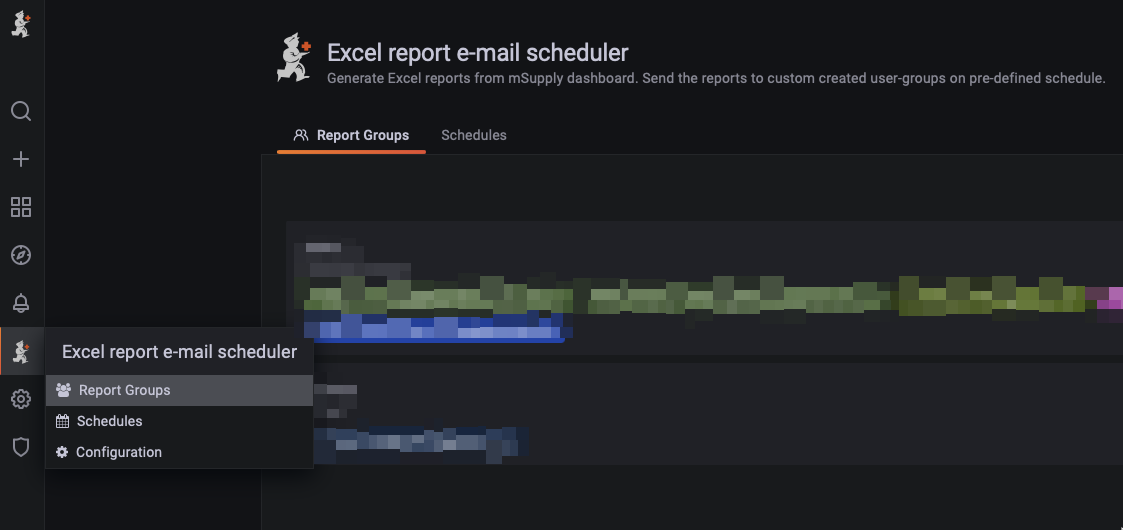
If you can see the Excel report e-mail scheduler plugin icon, you have the rights to create report groups and schedules.
The plugin has three pages, Report group, Schedules and Configuration.
Report group and Schedules pages are relevant to the end-user.
Configuration, although available should not be edited by end-user, editing configuration with wrong values might break the entire plugin's functionalities.
Steps
- Since we select the report group in schedule page while creating or updating schedule, you cannot create a schedule without report group.
- The first step would be to create a new Report Group. (More details below)
- Create new or edit a schedule (More details below)
Report Groups
Report Groups are groups of Users with email address. These groups are created so that we could send specific reports to specific user group. A user group can have one or multiple users.
The users mentioned here are mSupply users, which are also the dashboard users. To add/edit emails addresses to these users, you would have to do it in mSupply desktop and wait for the data to sync back to the dashboard.
User email is the most important and essential information the Report group keeps so we can only select users with email address.
The email address is used to send scheduled report so make sure you only select users you want certain reports to be sent to.
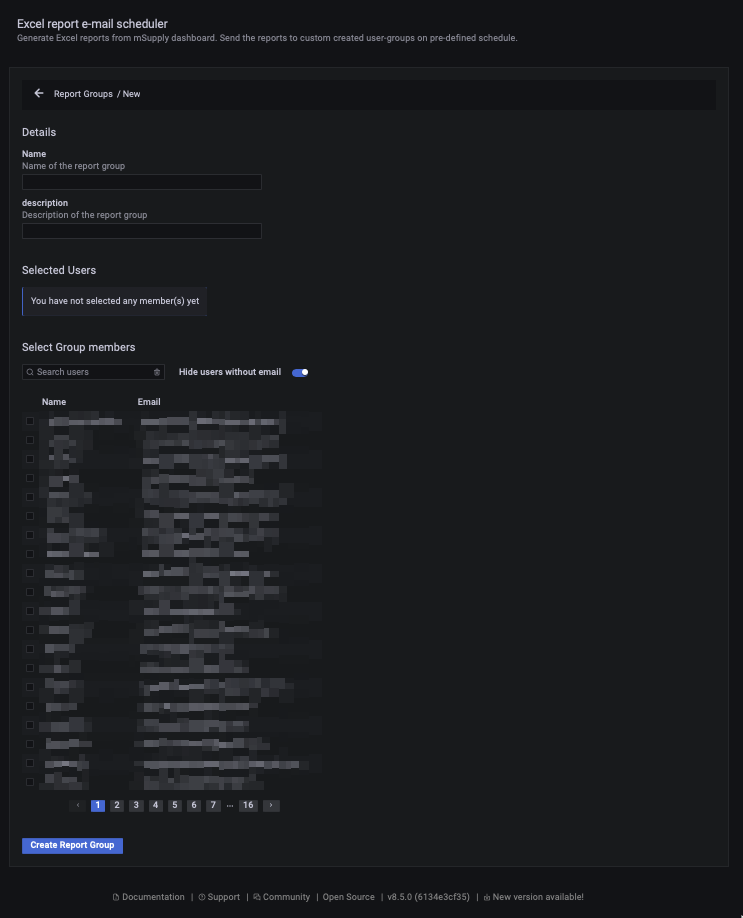
1. Name and description
The name of the report group.
This name would be selectable while creating a schedule so please give it some meaningful name, like the common designation of the users e.g. Admin, Trainees.
2. Emails in the group
This section shows the list of emails in the report group.
These are emails/users the report would be sent to, when a schedule that has this report group set, triggers.
3. Add report group
Instructions
- Give a meaningful unique name to the report group.
- A description would be nice to further describe the role of this report group
- Click on the users you would want to include in this report group.
- You can search for specific user if the list is long.
- Only users who have an email address can be included since the goal of the report group is to send specific emails all of the users in the group.
4. Edit report group
Button to edit existing report group.
5. Delete report group
Button to delete existing report group. This would permanently delete the report group.
Schedule
Schedules are schedules set by admins. It will run on set time on a daily daily, weekly etc. schedule.
Admin can select report group to send emails to and can select Grafana dashboard panels from which data would be extracted. The panels data are then converted into Excel file and emailed to the members (email address) of the report group.
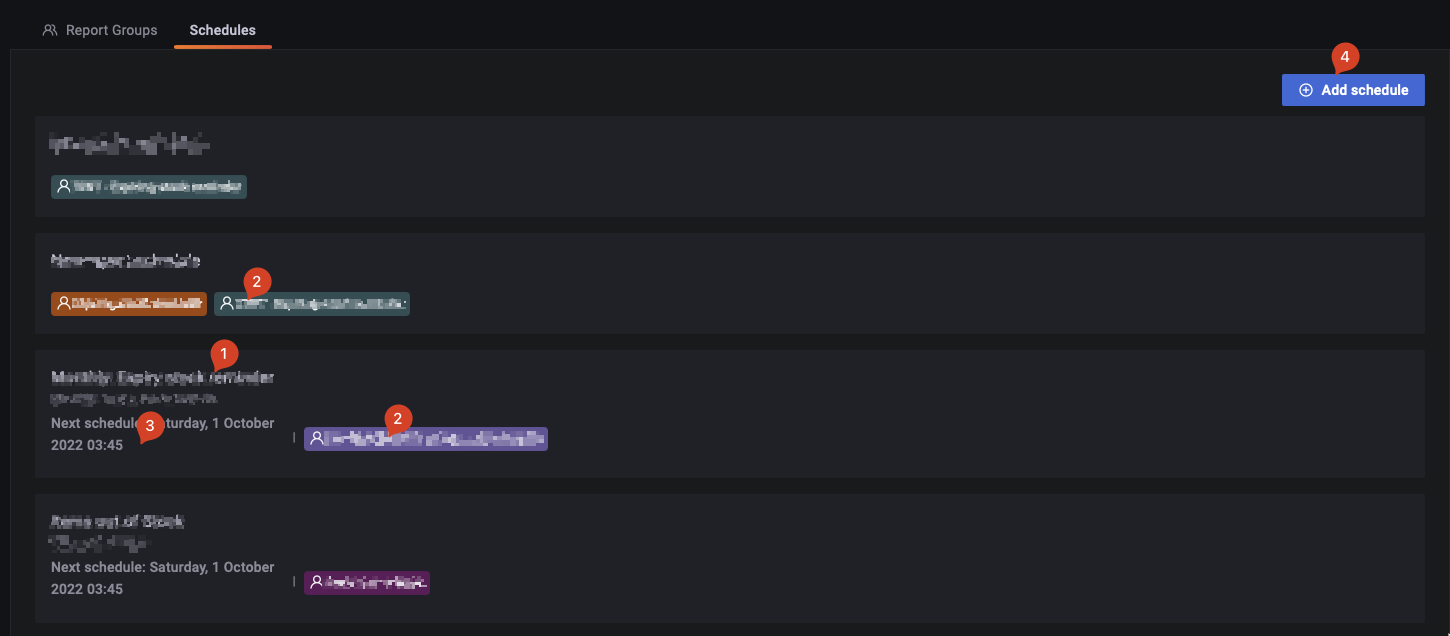
1. Name and description
The name and description of the schedule. Please give it some meaningful name.
2. Selected Panels
The list of Panels selected for this schedule, these are the panels from which data would extracted and sent to users in Report group.
3. Next schedule data and time
The date and time the schedule is slated to run next. For example if the schedule is daily, it would be a time within upcoming 24 hours. This would always be a date and time in the future.
4. Add new schedule
Button to add new schedule.
Edit and delete schedule are also available features. You can hover over a schedule to activate the button.
Add schedule page
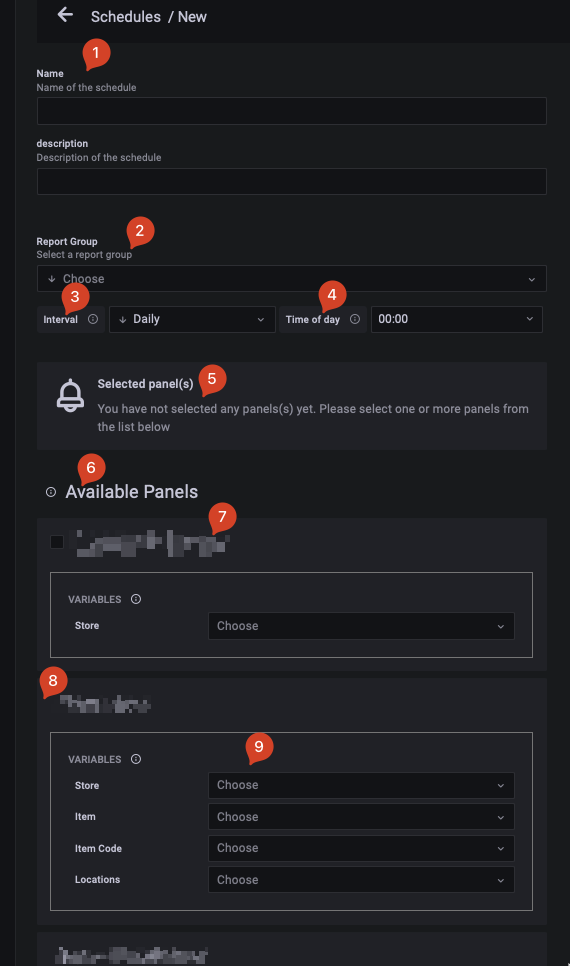
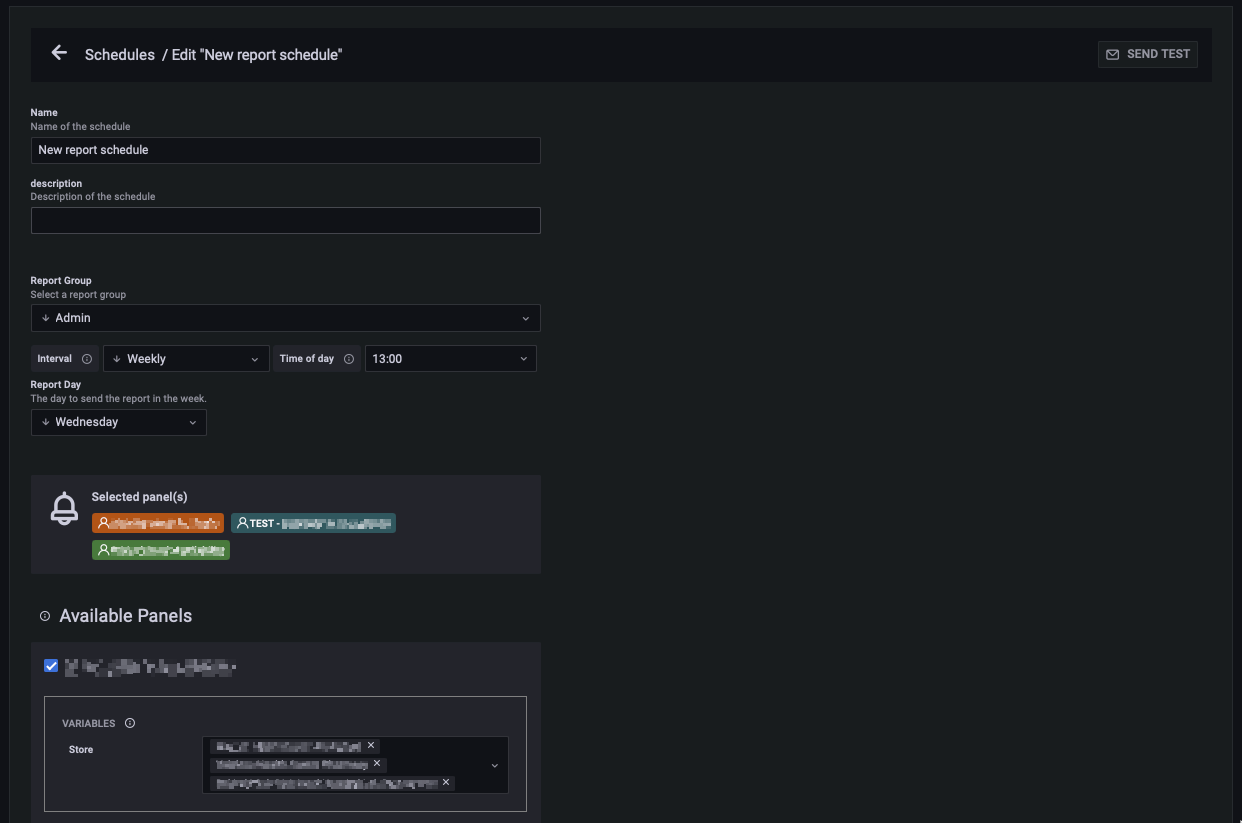
1. Name and description
The name of the schedule.
2. Report group
Select the report group you want the schedule to send excel reports to. It will be sent to all user's emails in the group.
3. Interval
You can choose if you want to send a report email daily, weekly, fortnightly, monthly, quarterly or yearly. Based on what you choose, you can also choose which day of the week, month or year you want the emails to be sent.
4. Time of day
You can choose the exact time when the emails will be sent. The time is in 24 hours format, so 13:00 would be 1pm.
4. Selected Panels
Once you start selecting panels you could see them here.
5. Available panels
The plugin supports a select group of panels.
- You can only use panels of Table type.
- You can only select panels where the query has lookup variables called in certain format.
Those panels that are not supported are not shown in the list. So if are wonder why a certain panel is not showing in available panels list, maybe its because the type of the panel is not table.
7. Panel name
The name of the panel.
8. No checkbox
If you see a panel in the list but do not see a checkbox in front of it, the variables and lookup the panel uses are not supported. Therefore it would not be selectable even if the panel type is table.
Ask somebody for the mSupply support group to maybe update the panel settings to fix this.
9. Variables
This is where you would customise the panel variables.
Some panels allow you to filter the data by some variables. For instance you can only ask the plugin to build the excel report from certain stores. To do that you can go to Store variable list and select the stores you want the data to be filtered by.
Variables can be text boxes, drop-downs and drop-downs with multi-select option.
The variables you apply here will filter data based on the variable. So if you select certain item in the variable list, only that items' data would be shown in the report email.
Leaving the variable blank will select all as the option.
Edit schedule page
Edit schedule page is pretty much the same as add but you get an extra Send Text email button at the top.
Send test
You can use Send test to immediately send the report email regardless of what Interval you had set. This is good to send on demand report certain users or to generally test to see if the report is getting data as you wish it to.
Lookup
Some of the Available panels would have Lookup option in it.
These are like the data range you set while viewing panels.
This will allow you to only see data from last 1 day, 1 week, 1 month etc.
