¡Esta es una revisión vieja del documento!
 Esta página no está completamente traducida, aún. Por favor, contribuye a su traducción.
(Elimina este párrafo una vez la traducción esté completa)
3. Creando el almacén
Una vez que se han configurado los sitios de sincronización, existen tres enfoques para crear y configurar la tienda que funcionará en ese sitio.
- Crear un almacén manual - this method is suitable if you are creating only a handful of stores
- Crear tiendas clonando otro almacén de sincronización - si está creando una mayor cantidad de almacenes, entonces es más apropiado que sean configurados por equipo de soporte de mSupply.
Crear un nuevo almacén manualmente
- En mSupply desktop, agregue un nuevo almacén en: Especial > Almacenes > Nuevo almacén (Special > Stores > New Store)
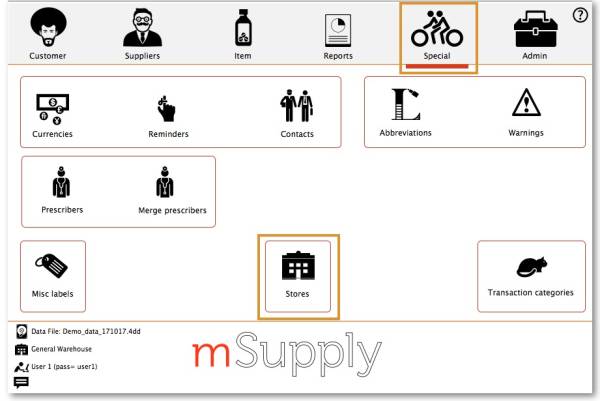

- Ingresar el código del almacén (Store code) y el nombre del local(Store name)
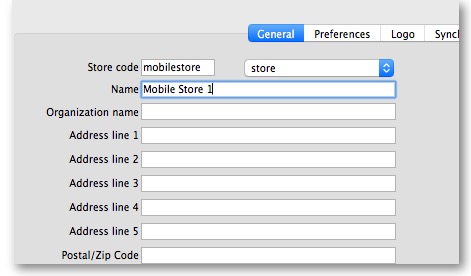
- El código del almacén no puede incluir espacios
- El nombre del almacén debe ser significativo para los usuarios
Tienda Móvil 1no es realmente un buen nombre para asignar a su nuevo almacén.


Crear un almacén a partir de un cliente existente
Este método solo es útil si ya tiene un cliente que desea convertir en una tienda.
We must first clone the existing customer then merge the new store with the existing customer.
Cloning the existing customer to a store
- The mSupply Support Team will use the footrunner code ''store_create_from_name'' to clone the original store. We will need to provide:
Name ID(not name Code ) to create the store for (must not be blank or already a store)
- Store mode for new store (one of
store,dispensaryorreport). Almost always, this should bestore Sync IDfor site on which the new store will be Active (optional; if left blank, will default to the current site ID)
Merging the new store with the existing customer
Using the mSupply Desktop User Guide merge the new store name with the existing customer name. There is some footrunner code that can facilitate this for multiple sites.
Before merging all unfinalised Customer Invoices from supplying stores to the existing customer must be finalised. On a system with supplying stores on multiple sync sites, this can take a long time. Start early, and if possible, ask the supplying stores to refrain from creating any new Customer Invoices until the merging is done…
If you try to do the merge before finalising all customer invoices, you will get an error message, and the merge will not proceed

Create store by cloning another sync store using sync_clone_sync_site
First manually create and appropriately configure a single store.
Make sure the relevant sync sites have been created and then, for EACH store:
- The mSupply Support Team will use the footrunner code
sync_clone_sync_siteto clone the original store. We will need:Sync IDfor source sync site
Sync IDfor clone sync site
Sync version(v1 for desktop, v3 for mobile)
- Decision on whether the cloned store will have 'group' store visibility (visible to all other stores with the same supplying store) or not
- Decision on whether to also clone locations, transactions, stock, requisitions. (almost always NO!)
- new store code and name for each cloned store
- new user name and password for the each cloned store's default user
- If there are actually existing customers for each of these stores, you will then need to merge the existing customer name with the new store
- The new store will have the same item visibility configuration as the original store. Review, and if necessary, configure items visibility
- The new store will have the correct 'basic' sync settings. Review, and if necessary, configure synchronisation settings
- The new store will have the correct 'basic' store visibility settings, including, if you have selected it, 'group' store visibility. Review, and if necessary, configure store visibility to other stores
| Previous: 2. Create Sync Site | | Next: 4. Configuring the Store and Dispensing |