This is an old revision of the document!
3. Create the Store
After the sync sites have been set up, there are three approaches to creating and configuring the store that will be operated on that site.
- This can be done 'manually' as described in the first method below. This method is suitable if you are creating only a handful of stores.
- If you are creating a larger number of stores, then it is more appropriate to use one or both of the two footrunner code methods. As of 2019-10-24 there are two pieces of footrunner code that can expedite this process - see:
- Creating data files for multiple new remote sites. They can not be used together for the same store, but it may be appropriate to use
- store_create_from_name for creation of one store, and then use
- sync_clone_sync_site to create subsequent stores.
Manually create store
- On mSupply desktop go to Special > Stores > New Store
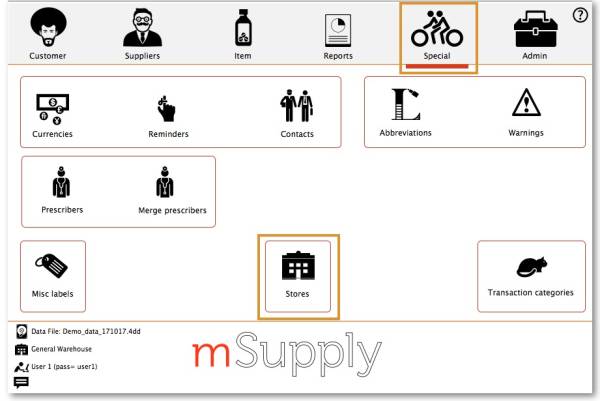

- Enter the Store Code and the Store Name
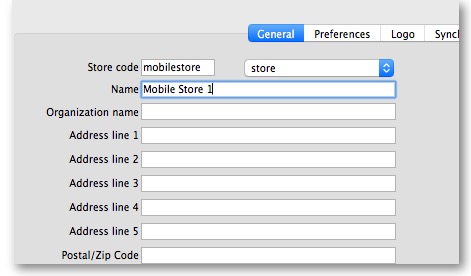
- The Store Code can not include spaces
- The Store Name needs to be something that users will recognise.
Mobile Store 1is not likely to be a good name to use.


Create store for existing customer
This method is only useful if you already have a customer that you want to convert to a store.
We must first clone the existing customer then merge the new store with the existing customer.
Cloning the existing customer to a store
- The mSupply Support Team will use the footrunner code ''store_create_from_name'' to clone the original store. We will need to provide:
Name ID(not name Code ) to create the store for (must not be blank or already a store)
- Store mode for new store (one of
store,dispensaryorreport). Almost always, this should bestore Sync IDfor site on which the new store will be Active (optional; if left blank, will default to the current site ID)
Merging the new store the existing customer
Using the mSupply Desktop User Guide Merge the new store name with the existing customer name. There is some footrunner code that can facilitate this for multiple sites.
NOTE: Before merging any unfinalised Customer Invoices from supplying stores to these existing customers need to be finalised first. On a system with supplying stores on multiple sync sites, this can take a long time. Start early, and if possible, ask the supplying stores to refrain from creating new Customer Invoices until the merging is done…
If you try to do the merge before finalising unfinalised customer invoices, you will get an error message, and as that message indicates, the merge will not proceed

Create store by cloning another sync store using sync_clone_sync_site
First manually create and appropriately configure a single store.
Make sure the relevant sync sites have been created and then, for EACH store:
- The mSupply Support Team will use the footrunner code sync_clone_sync_site to clone the original store. We will need:
Sync IDfor source sync site
Sync IDfor clone sync site
Sync version(v1 for desktop, v3 for mobile)
- Decision on whether the cloned store will have 'group' store visibility (visible to all other stores with the same supplying store) or not
- Decision on whether to also clone locations, transactions, stock, requisitions. (almost always NO!)
- new store code and name for each cloned store
- new user name and password for the each cloned store's default user
- If there are actually existing customers for each of these stores, you will then need to merge the existing customer name with the new store
- The store will have the same item visibility configuration as the store that has been cloned. Review, and if necessary, Configure items visibility for the store
- The store will have the correct 'basic' sync settings. Review, and if necessary, configure synchronisation settings
- The store will have the correct 'basic' store visiblity settings, including, if you have selected it, 'group' store visibility. Review, and if necessary, configure store visibility to other stores
| Previous: 2. Create Sync Site | | Next: 4. Configuring the Store and Dispensing |